Colgate: Using Design Thinking to Create a Better Website

Unsolicited redesign of Colgate’s website by Jeff Shibasaki
Part 1: The Challenge
Background
Colgate is a $15.5B global consumer product company that was first introduced in 1806 when William Colgate started a starch, soap and candle business in New York City.
Today, the competition in the oral care market is more competitive than ever before with direct competitors like Procter & Gamble (Crest, Oral-B, Scope), Johnson & Johnson (Listerine), GSK (Aquafresh) and Church & Dwight (Arm and Hammer) as well as new competitors like Quip and Burst.
With this much competition, staying relevant and top of mind requires an outstanding customer experience –– online and offline.
Problem

The inspiration for this project began when I noticed Colgate’s smart toothbrush is the only toothbrush sold on the online Apple Store.
Unlike other toothbrushes, Colgate’s Smart Electronic Toothbrush E1 monitors brushing duration, frequency and surface area to improve your oral health. It also pairs with iPhone, iPad and Apple Watch apps, gamifies brushing for kids and integrates with Apple’s ResearchKit to optionally share data with oral health researchers. It’s an impressive toothbrush!
When I visited Colgate’s website to learn more, I was surprised to discover their design didn’t equal the slick toothbrush. That led me to start investigating if there was more to learn from the competition and representative users.
Scope
I only focused on redesigning Colgate's homepage for this case study, but all tasks that led to inner and external pages were rethought and illustrated with task flows and wire flows.
Roles
User research
Information architecture
Copywriting
Content strategy
Visual design
Tools
Paper
Markers
Miro
Pages
Sketch
CSS Peeper
Pixelmator
Copyright
All photos included in my design are copyrights of Colgate-Palmolive.
Part 2: The Process
I conducted a one-week design sprint based on the design thinking methodology that includes 5 stages –– empathize, define, ideate, prototype and test. However, since I was unable to validate my solution through testing and revisions, the process is incomplete.
Step 1: Empathize

To understand Colgate’s competition, I conducted a competitive analysis and audited websites from traditional competitors like Crest, Aquafresh and Sonic Care as well as new competitors like Quip and Burst to learn what they were doing right, wrong or not doing.
One of the main assumptions that I gleaned from this analysis was that most direct competitors use low-quality photos of people smiling and have poor copywriting while tech-inspired startups like Quip have modern visual designs, testimonials and compelling copy.

I conducted 5 site visits that involved representative users performing the following representative tasks:
Completing tasks on Colgate’s website (2 site visits)
Shopping for oral care products (1 site visit)
Performing oral care routines (2 site visits)
Step 2: Define
To simulate a real-world, design thinking activity, I created an experience map in Miro. This map is similar to an affinity diagram, but highlights the order of actions and pain points experienced along the way.
First, I pulled the salient details from the competitive analyses and site visits. Then, I added that data to the experience map as yellow sticky notes with the first part of the process on the left, followed by each subsequent step.
Next, I grouped the data (yellow stickies) into themes (blue stickies) and grouped those themes into tasks (green stickies).
After that, I used dot-voting by placing dots on the biggest pain points. Since I was the only person voting on this solo project, I used two dots for issues that I considered important and three dots for issues I considered urgent. Stickies that had similar pain points were combined.
Finally, I tallied the dots to find the biggest pain points. These would become the foundation for the user-centered design strategy.
The design strategy began with the stickies that had the most pain points (i.e. the dots). Then, I inverted those pain points to create a list of goals to work toward, but I also made sure that these had a business perspective to balance user needs with business needs.
To create the metrics, I first determined what success looked like for each goal. Then, I worked out how I could measure that success in terms of user efficiency (i.e. time to complete), increased effectiveness (i.e. reduction in errors) or increased customer satisfaction (i.e. happiness with the system).
Throughout the rest of this project, I’d refer to the design strategy to ensure my solution addressed user goals.
When I created the experience map, I had a set of stickies left over that described user attributes instead of observations about specific tasks. So, I added those stickies to a persona board in Miro.
When I found clusters with similar attributes, I grouped them into themes (blue stickies). When I found patterns in the data, I gave the stickies corresponding colors and names. In the end, I found three characters that represented key users. I called them Tina Toothbrush, Mother Toothpaste and Dr. Mouth.
By focusing on the needs of these representative characters, I could deliver a streamlined solution that has a consistent, targeted message. First, I needed to create their personas.
Since I didn’t have a large amount of user data to base my design decisions around, I used the persona board to create assumption personas (i.e. proto-personas) in Pages. I created the primary persona (i.e. the most strategic) named Tina Toothbrush as well as the secondary persona named Mother Toothpaste and the tertiary persona named Dr. Mouth.
When using multiple personas, I believe it's best to design for the primary persona, but accommodate the secondary and tertiary personas. This way, I can satisfy the primary persona, but also delight the secondary and tertiary personas.
If this were a real project, I’d use the assumption personas as working models, verify the personas as more data is collected during testing, and, if necessary, make refinements over time as I learned more about the users’ needs.
Step 3: Ideate

While I had only planned to redesign the homepage, it was important to understand how users access inner pages from the main navigation, homepage and footer. As a result, my sitemap sketches eventually led to a more efficient and intuitive structure.

To ensure I had properly thought out the sitemap, I sketched task flows for tasks that the primary persona needs to accomplish to buy Colgate products. These sketches helped me think through all of the tasks and find opportunities to reduce clicks to complete each task more efficiently.

Since two of the project goals were to provide product suggestions on the homepage that work together, I initially sketched wireframes that included these products in the hero section. Ultimately, though, I decided to use the smart toothbrush for the hero section because it addressed so many more user pain points.

I added this extra step of paper prototyping in the design thinking process because I wanted to be certain that a representative user could easily accomplish tasks. I also wanted to be sure the user experience was aligned with business goals.
I used three sets of wireframes to complete each task. The user feedback informed me that my third wireframe was the easiest to navigate. That helped me move onto prototyping in software.
Step 4: Prototype
By the time I moved to software, I’d locked the architecture. Still, designing the sitemap in Sketch helped me organize all my sketches and notes into an easy-to-read artifact.


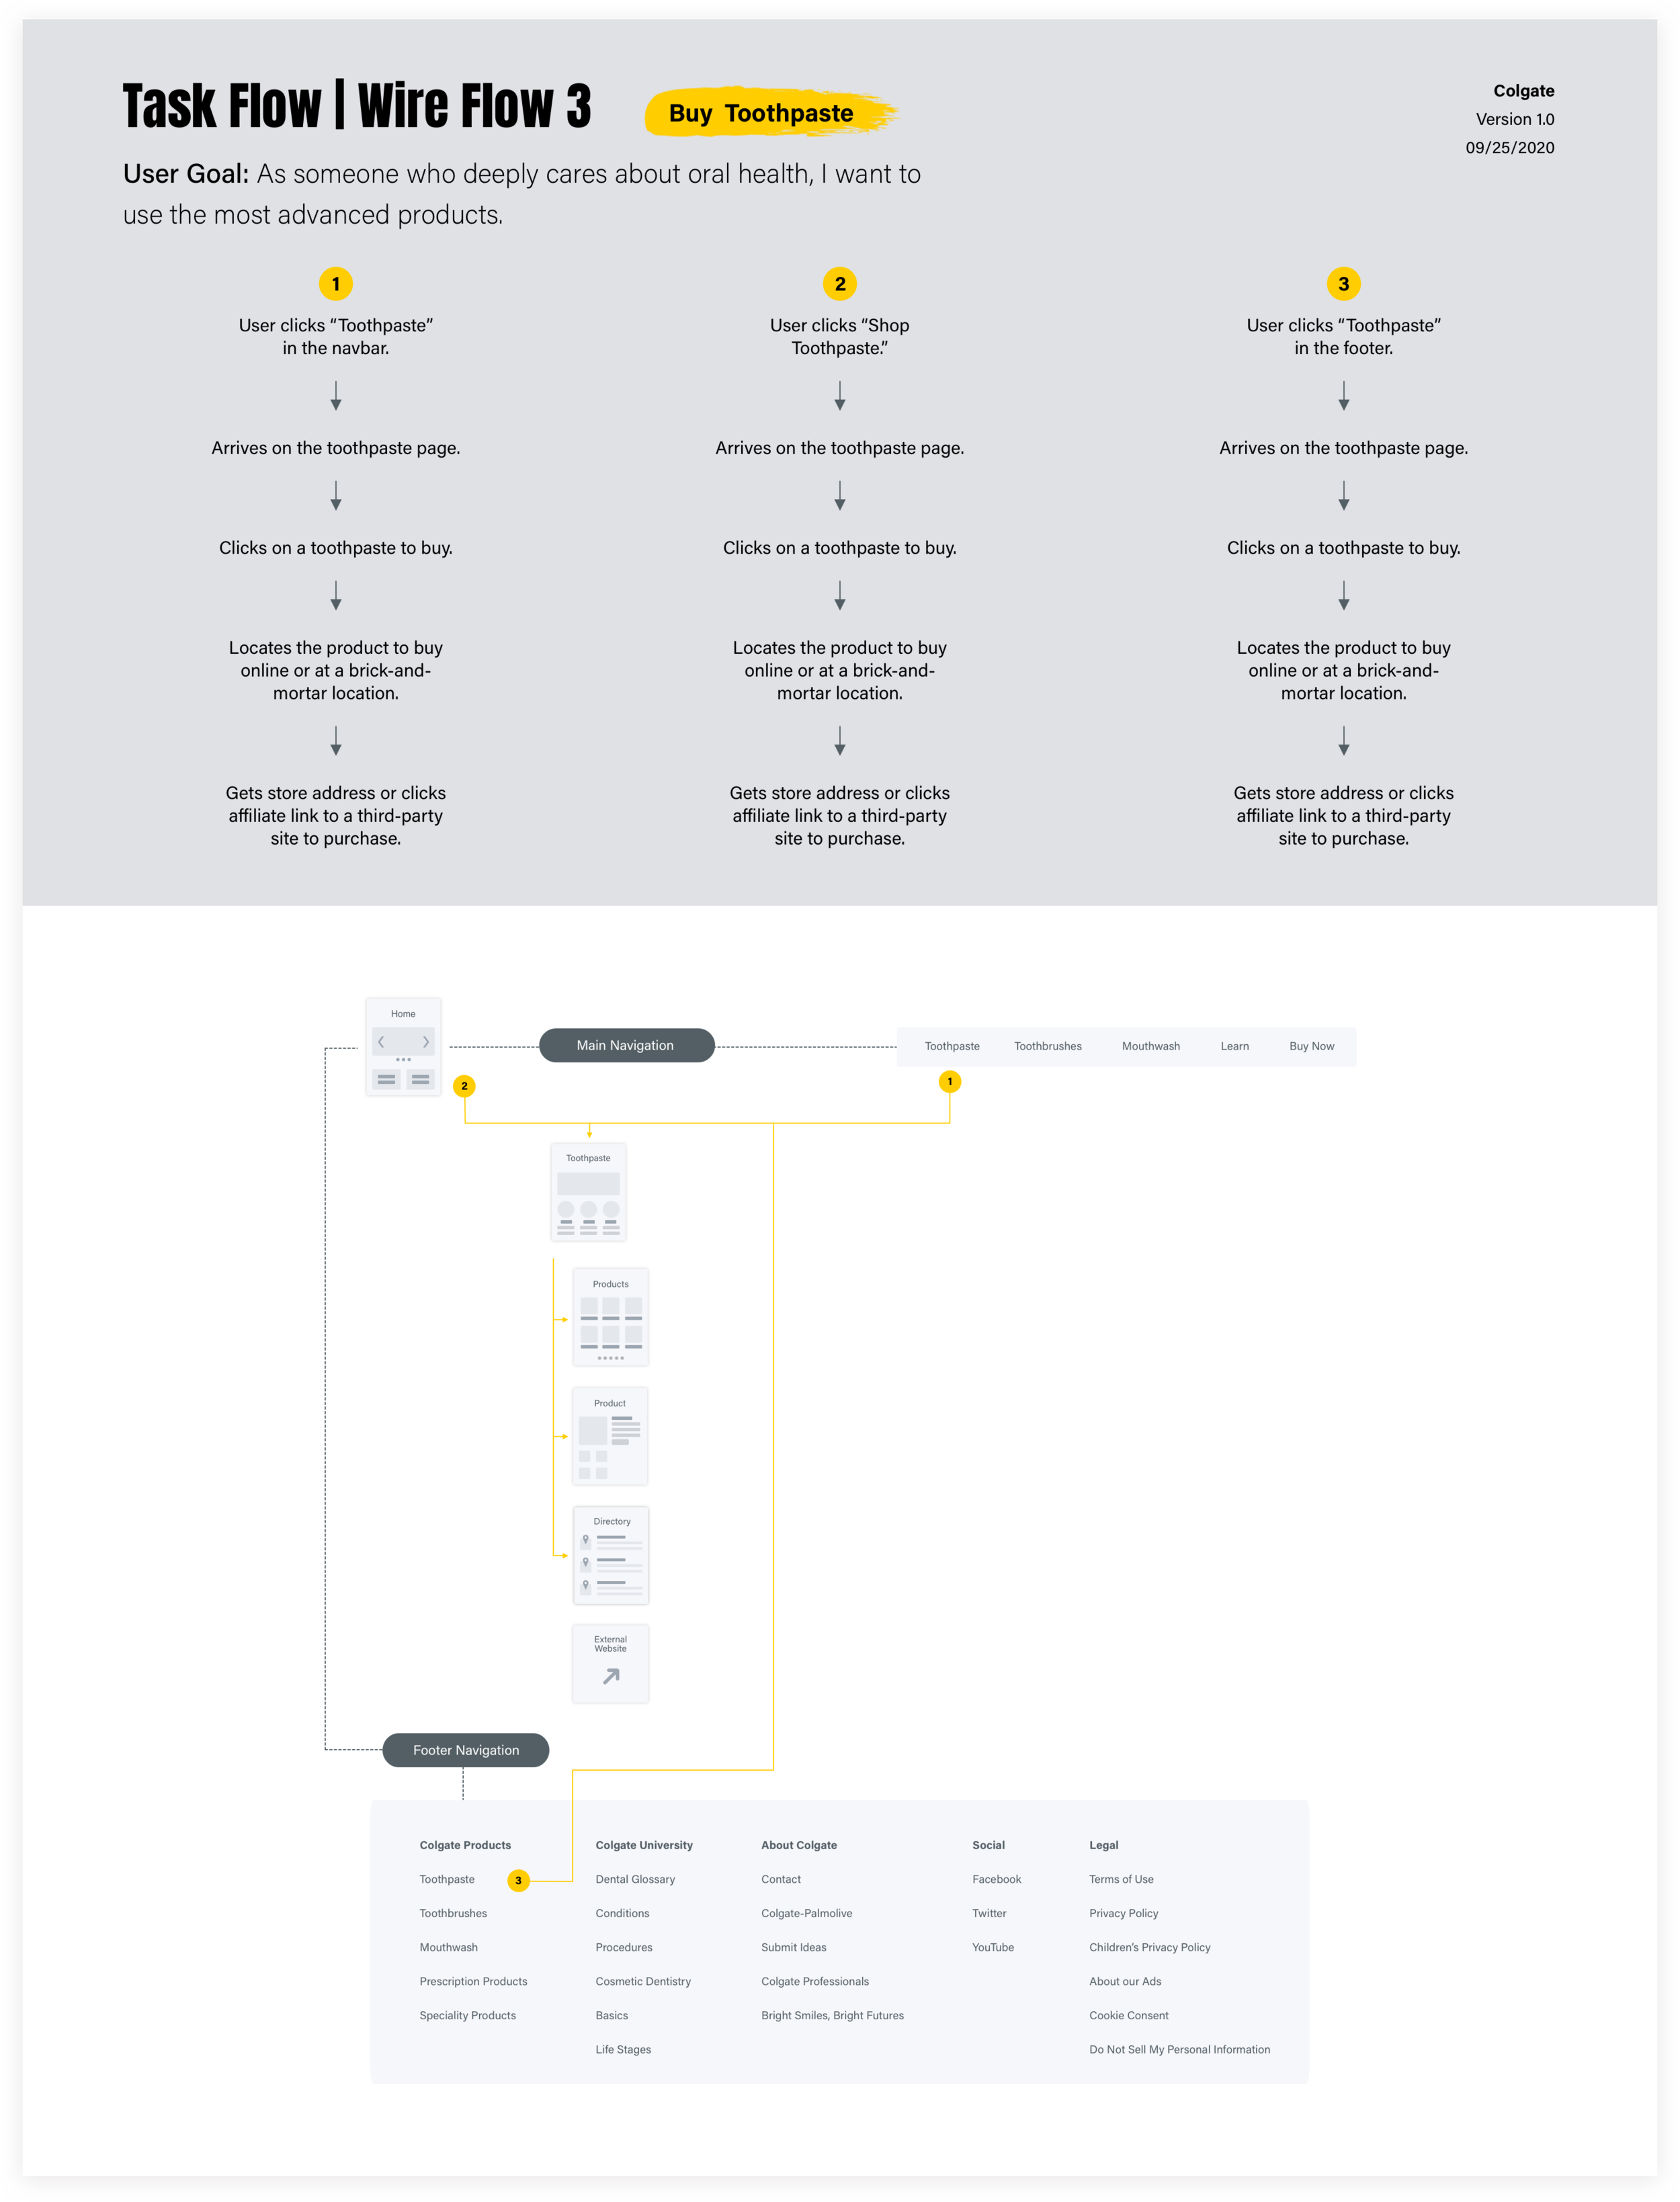

I created four task flows and wire flows in Sketch that were based on my earlier sketches. I started with the user goal, which I defined as the following:
“As someone who deeply cares about oral health, I want to use the most advanced products.”
These flows provide a high-level overview of how the primary persona (Tina Toothbrush) would complete multiple purchasing tasks from the website’s main navigation, the homepage and the footer.
The result of this stage clarified the user flow and made it clear that I was ready to design the final wireframe in software.

I created the low-fidelity wireframe in Sketch. The changes I made from my original sketches were based on user-testing feedback of the paper prototype.
For example, the user thought there should be a newsletter sign up form somewhere on the page to receive offers, coupons and to stay up to date with Colgate news. That feedback led me to add the sign up field and button in the footer because it would appear on every page of the website. I also made the button fun and enticing with a “Smile Up” call to action.

Before I moved onto the high-fidelity design, I wanted to create a style guide that would aid me during the design process and, if necessary, provide me with an artifact that I could refer to later. Since Colgate doesn’t have a style guide that I could find online, I needed to create one myself.
I used CSS Peeper to inspect Colgate’s color codes and added blue because it provides a warm contrast to the red. That contrast also inspired me to add blue and red gradients. Overall, I thought these colors also solved another pain point for users who found Colgate’s visual design to be mundane.
Also, since Colgate uses its own proprietary typeface called Colgate Ready that’s unavailable to download, I chose Avenir Next because it’s a similar and modern typeface.
Part 3: The Solution

For the high-fidelity design, I scoured Colgate’s website for images and used CSS Peeper to download those images. I also searched the web for product images since most of Colgate’s images were of low quality. I wanted to create an effective content strategy that aligned with the project goals and that would satisfy the primary persona. I also wrote copy that would entice users to complete the goals.
Since this project doesn’t include a tested prototype with a verified implementation plan, it’s merely an unproven concept at this stage. What’s missing? All the steps from the task flows and wire flows that aren’t part of this high-fidelity, final design.
To complete this project and ensure the goals were achieved, I’d first need to validate the assumption personas that I created with quantitative and qualitative data. If that data didn’t confirm my assumptions, I’d have to redefine the personas. However, if that data did confirm my assumptions, I’d conduct user-testing, redefine or refine the problem, brainstorm new ideas, create new prototypes and conduct user testing.
Final Thoughts
I set out to investigate redesigning Colgate’s website because I didn’t think it equaled their slick toothbrush that’s for sale on the Apple Store. During this project, I discovered the importance of sketching and paper prototyping. Not only was I able to get great feedback from user-testing, but by the time I created the wireframe in Sketch I had already refined the low-fidelity design.